Abstract
The load-bearing capacity of joints using thin steel elements for wood buildings was considered. Six variants of a specific type of joint consisting of two wood elements in a ceiling structure joined by steel angles were experimentally tested. These variants differed in utilization of nails as well as screws (of various lengths) for wood. Another observed factor was the percentage of holes filled in the angles. In this work the percentage of holes filled means how many of the holes in the steel angles were filled by nails/screws. The evaluation characteristic was the maximum loading force at the breaking point. Based on the results, a set of recommendations for designing a specific type of joint with steel angles was formulated. The results showed that during loading of the joints, tensile stresses occur in the direction perpendicular to the fibers, which causes a failure of the wood parts of the joints.
Download PDF
Full Article
Experimental Evaluation of Joints using Thin Steel Angles for Wood Structures
Daniel Ruman,* Milan Gaff, Miroslav Gašparík, and Marián Babiak
The load-bearing capacity of joints using thin steel elements for wood buildings was considered. Six variants of a specific type of joint consisting of two wood elements in a ceiling structure joined by steel angles were experimentally tested. These variants differed in utilization of nails as well as screws (of various lengths) for wood. Another observed factor was the percentage of holes filled in the angles. In this work the percentage of holes filled means how many of the holes in the steel angles were filled by nails/screws. The evaluation characteristic was the maximum loading force at the breaking point. Based on the results, a set of recommendations for designing a specific type of joint with steel angles was formulated. The results showed that during loading of the joints, tensile stresses occur in the direction perpendicular to the fibers, which causes a failure of the wood parts of the joints.
Keywords: Nails; Thin angle; Wood beams; Screws; Loading capacity
Contact information: Department of Wood Processing, Czech University of Life Sciences in Prague, Kamýcká 1176, Praha 6 – Suchdol, 16521 Czech Republic;
* Corresponding author: dano.ruman@gmail.com
INTRODUCTION
The joints of wood construction elements are critical details from the viewpoint of the design of wood structures. Such structures show certain disadvantages compared to other material-based structures. When using steel or concrete, it is possible to create a technologically simple monolithic jointing of elements, whereas for wood, only the gluing of it can convert it into a monolithic jointing (Hrčka 1996).
Carpentry joints have been the most common joining method until recently. Their main disadvantage is significant weakening of the cross section. For these reasons, traditional carpentry joints have been replaced by metal jointing elements, which allow preservation of the joint nature. Joining process with metal elements is much simpler and faster. Metal joints create an analogy to steel plates with overpressed pins at truss girders. Therefore, these joints can be used for assembly on site and can be connected to wood by nails or screws. For their application, there is no need for qualified support of carpenters (Kuklík and Šťastný 2002). Based on the mutual position of the joint wood elements, there are three basic joints groups:
- Joint, where the end of one element is in contact with the edge of the second element (Fig. 1). This type is known as end-grain to side-grain in English literature. This is, g., a jointing of ceiling beams to a bearer (examined scenario) jointing of a grid of beams or jointing of a bearer to column. For this contact, the most frequently used tools are U-shaped “slippers” and angle bars, both without and with reinforcing ribs (Kuklík and Šťastný 2002).
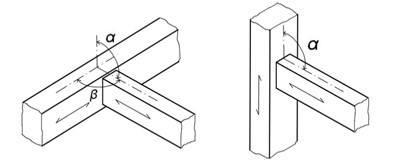
Fig. 1. Mutual position of elements end-grain to side-grain
- The elements are in contact on sides (side-grain to side-grain). This connection is created by ceiling beams or bearers with columns, attaching collar tie to a central purlin (Fig. 2). In this case, the elements are connected to angle bars with ribs or special angles (Kuklík and Šťastný 2002).
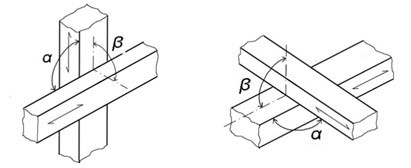
Fig. 2. Mutual position of elements side-grain to side-grain
- The jointing of the element endings (end-grain to end-grain) in the point of zero bending moment (Fig. 3). For this jointing, it is possible to substitute thin steel joints for a standard carpentry joint. These are mounted to the wood elements using special nails or screws. It is important to keep in mind that the joints transfer only the moving forces, not bending moments.

Fig. 3. Mutual position of elements end-grain to end-grain
Because of great variability of jointing and utilization of steel elements, it is very difficult to design a general testing procedure. Currently, the RILEM TC 169 MTE technical board is concerned with this issue.
The following section will address the theoretical analysis of joint bearing capacity in more detail.
Total jointing bearing capacity is determined as a bearing capacity of each part of the jointing as defined by the following formula (Kanócz 2001),
Rc = min{ Rd;Rt;Rh } (1)
where Rc is the total jointing bearing capacity (MPa), Rd is the nail joints bearing capacity (MPa), Rt is the bearing capacity of connected wood elements (MPa), and Rh is the bearing capacity of steel angles (MPa).
The resulting bearing capacity of the whole jointing is then determined as a value of bearing capacities of the individual jointing components. For this reason, fragmental analysis of individual bearing capacities is necessary (Kanócz 2001).
Nail Bearing Capacity
In most cases, nails with screw shanks are used because of their increased withdrawal bearing capacity. For the assessment of the shear bearing capacity of the jointing types, the European Yield Theory of K. W. Johansen (1949) appears to be the most suitable.
Bearing Capacity of Connected Wood Elements
All the dowel type joints, loaded slantwise to the wood fibers, cause significant tensile forces perpendicular to fibers. This is dangerous for two reasons. The force acts in the direction of the lowest bearing capacity and depends on the joint location with regard to the loaded edge. These tensions reach values exceeding the wood strength and therefore can lead to failure of the jointing, even before reaching the bearing capacities of the individual jointing types. According to Koželouh (1998), the tension strength perpendicular to fibers ft,90 is in the range of 1 to 2 MPa and depends on the loaded volume.
Tension strength perpendicular to fibers ft,90 is significantly reduced by the existing cracks, especially in the spring wood.
Currently, there is a number of methods for the description of these tensions. Among the most important methods belong:
- Simplified method adapted for EC 5;
- Method based on the theoretical and experimental evaluations;
- Method based on the fracture mechanics theory.
Bearing Capacity of Steel Angles
In the jointing, the thin steel joint is always exposed to a combination of various loads, and therefore determination of its bearing capacity is not simple. It is exposed to a combination of normal and shear forces. The distribution of the tension in the angle must be determined using a computer simulation based FEM.
EXPERIMENTAL
Materials
For the experimental evaluation, Norway spruce (Picea abies L.) trees were used. The trees were harvested in the Poľana region in the center of Slovakia. The trees were cut to planks of the dimensions 50 × 110 × 1000 mm. Subsequently, the planks were glued together lengthwise to a beams with dimensions of 100 × 110 × 1000 mm using adhesive Jowapur 686.60 (Jowat Corporation, Germany).
The 12% moisture content of the wood was achieved by conditioning in a climate chamber APT Line II (Binder; Germany), (ϕ = (65 ± 3) % and t = (20 ± 2) °C) and verified according to ISO 13061-1 (2014). The average density of the wood was determined according to the standard ISO 13061-2 (2014). The oven-dry average density value ρ0 was 0.410 g/cm3. This value is comparable with values published in literature, e.g. Požgaj et al. (1997). The samples were loaded on a FPZ 100 testing machine (Heckert, Germany). The six sets of samples were compared at the same conditions of loading (Fig. 4). Ten samples were assigned for each set.
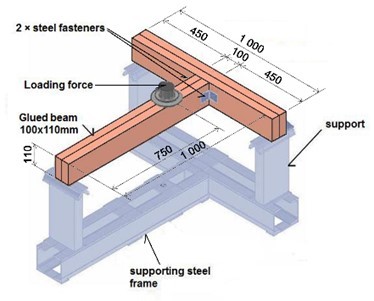
Fig. 4. The scheme of loading
For a cross-wise jointing of two wood pieces of 100 × 110 mm profile and 1 m length, two steel thin angles were used (Fig. 5). Sets for classification of samples are shown in Table 1.
Table 1. Classification of Sets of Samples

In Figures 5, 6, and 7 the BMF steel elements made by Simpson Strong – Tie® company (USA) were used in the experiment. This experiment was aimed at the evaluation of the influence of hole filling percentage and the length of the screws.

Fig. 5. BMF steel angle 2 × 60 × 60 × 60 mm (serial number 30666 00)
Methods
The whole experiment was carried out according to Ruman (2009). Prior to the mechanical tests, the maximum tension force estimate FEST was measured. The loading was carried out according to the standard EN 26891 (1991). The value of measured estimate of the maximum tension was FEST = 16.5 kN (for variants A, C, and E) and FEST = 10 kN (for variants B, D, and F). In Fig. 8, positions of the sensors of deformation and loading force measurement are illustrated.
Fig. 8. Scheme of shear sensors positioning (Y1, Y2, Y3)
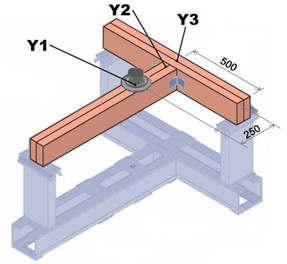
Deformation was measured by the universal data logger ALMEMO 2690-8 (Ahlborn GmbH; Germany).
The loading of joints was carried out up to a limit of 0.4 × FEST, according to the standard EN 26891 (1991). Then, the sample was kept under this load for 30 sec. Later on, the loading was lowered to the value of 0.1 × FEST, and again kept in the loaded state for 30 sec (Fig. 9).
After this period, the loading increased until the failure of the sample. In the case that failure did not occur below 15 mm deformation Y2, the loading was stopped. During the test, a constant 0.93 cm/min speed of loading was kept.
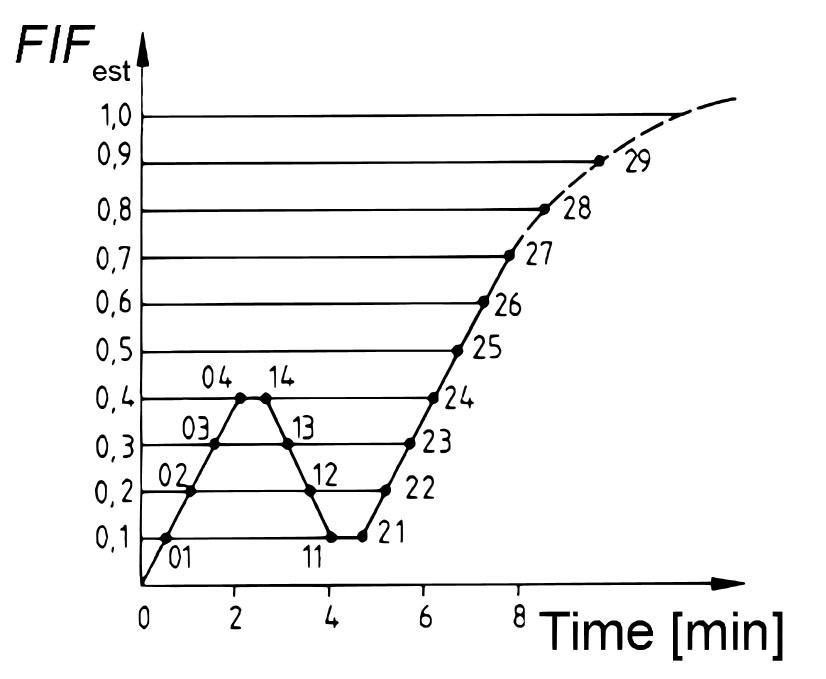
Fig. 9. Course of loading
For each tested sample, a load – deformation curve (Fig. 10) was obtained and a deformation value at the maximum loading force FMAX determined. Figure 10 shows the ideal force – deformation relationship.
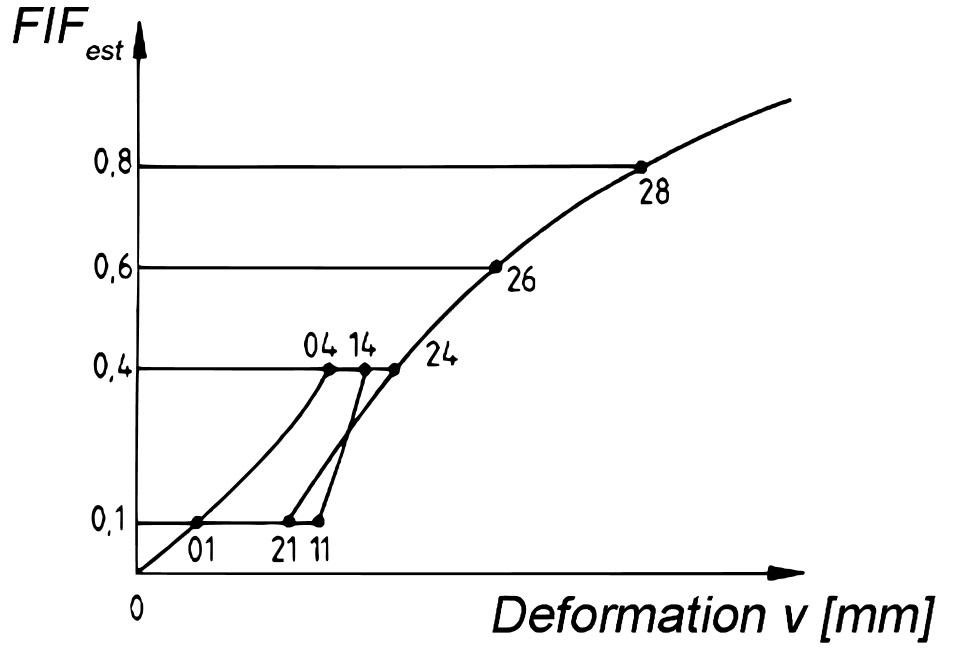
Fig. 10. Idealized force – deformation relationship
For the experiments, the following values were determined from the measured values according to the EN 26891 (1991):
- Maximum loading force FMAX [kN] (for variants A, C, and E)
- Maximum loading force at limit deflection of 15 mm, FMAX,15 [kN] (for variants B, D, and F)
RESULTS AND DISCUSSION
Table 2 displays the results of the effects of individual factors as well as the two-factor interaction. Significance level “P” confirms very significant effects of the individual factors. Synergic effect of both factors was not demonstrated to be statistically significant.
Table 2. Variance Analysis Evaluating the Effect of Individual Factors and Interaction on Maximum Loading Force
Figure 11 shows that the highest values of the examined characteristics were found for screws of ϕ5 × 40 mm. The average value of maximum loading force at sample failure for this case was 15.7 kN. The lowest average value of the examined characteristics was found for the ϕ5 × 25 mm screws of 12.1 kN. In the case of using the ϕ4 × 40 mm nails, the values of FMAX were lower than the values for the screws of ϕ5 × 40 mm dimensions. Between the screws of ϕ5 × 25 mm and nails, no statistically significant difference was found.
Figure 12 shows that with 100% angle holes filled the examined characteristics were able to reach significant greater values than with the 60% angle holes filled. The difference between the values of maximum loading force at sample failure between 60% and 100% holes filled was 69% by jointing types. The portion of angle holes filled had a very significant effect on the values of FMAX. This decrease results in significantly lowered functionality of the given jointing.
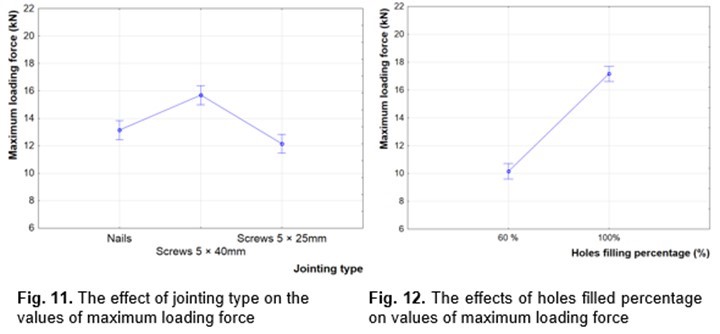
It is clear from the data in Figs. 13 and 14 that no significant difference was observed when comparing values for nails and screws of 25 mm length at 60% holes filled. The screws of 40 mm length showed significantly higher values compared with nails and screws of 25 mm length. Similar fact can be observed for the 100% angle holes filled.
The results of the angle holes filled comparison, confirmed a statistically significant difference between the obtained values. It was found that for the 100% angle holes filling, there were significantly higher values of FMAX in comparison with the 60% holes filling for all three examined cases.
From Fig. 14, it is evident that the highest values of the examined characteristics were found for screws of ϕ5 × 40 mm. The average value of maximum loading force at sample failure for this case was 19.2 kN. The lowest average value of 8.9 kN was found for ϕ5 × 25 mm screws at 60% angle holes filling.
Comparison of the FMAX values of all of the examined sets of samples is depicted in Fig. 15. Based on the results it can be concluded that the highest values of FMAX were measured for the variant C (ϕ5 × 40 mm screws). The lowest values were for the variant B (ϕ 4 × 40 mm nails) and F (ϕ 5 × 25 mm screws).
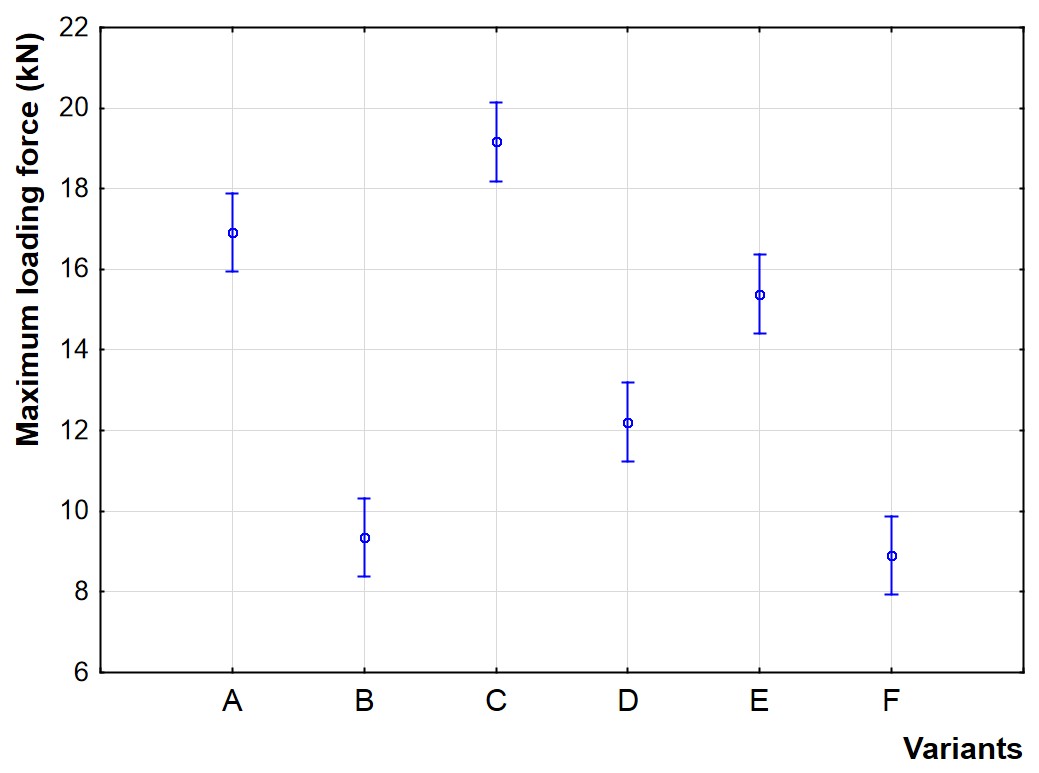
Fig. 15. Influence of variant type on the maximum loading force
From the force – deformation curves illustrated in Fig. 16, it is clear that the curves of the jointing A, C, and E (at 100% angle holes filling) exhibited a similar course. The same can be said for the shape of curves characterizing jointing B, D, and F (100% angle holes filling). From the viewpoint of the lowest jointing type compliance, the ϕ5 × 40 mm screws for wood at 100% angle holes filling appeared to be the most suitable. The ϕ4 × 40 mm nails exhibited the highest level of compliance during the experiments.
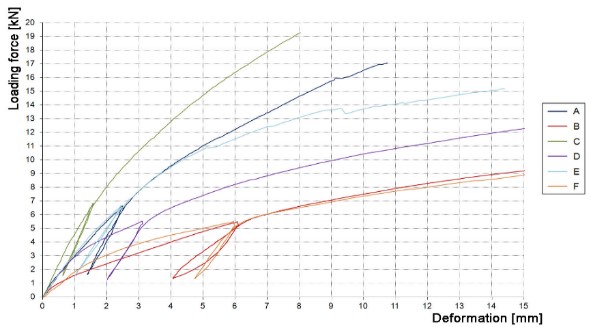
Fig. 16. Average values of force – deformation diagrams for all variants
For jointing A, C, and E (100% angle holes filling by nails or screws) a similar type of failure occurred; in the last row of nails or screws, the loaded wood element broke due to the effect of tensile load perpendicular to fibers (Fig. 17). The failure occurred in identical parts of the wood. During the loading, a slight extraction of the nails and screws occurred.
For the variants A, C, and E (100% angle holes filling), plastic deformations on the angles were observed.
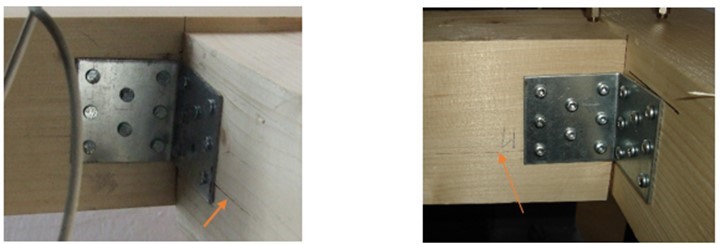
Fig. 17. Types of failures for variants A and C
(Note: Orange arrows show visible cracks on loaded elements)
For the jointing B, D, and F (60% angle holes filling), the failure of the wood as an effect of the tensile loading perpendicular to the fibers to the limit deflection of 15 mm did not occur. The sample deformations continued without a significant failure. After unloading, the samples did not return to their original position. Thus, a plastic deformation of the loaded element as well as the steel angles occurred.
The steel angles deformed strongly for the jointing A, C, and E (100% angle holes filling). In Fig. 18 there are some types of failures or limited deformations.
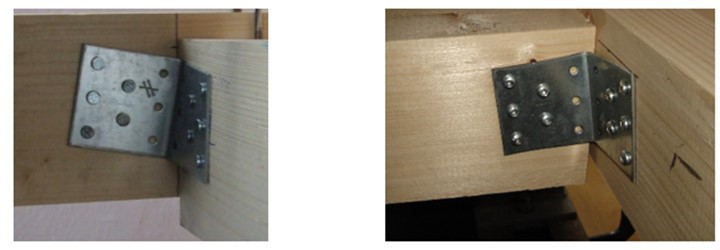
Fig. 18. Types of failures for variants B and F
For the variants, 60% of filled holes the asymmetric arrangement of screws and nails was chosen because it is very frequent in praxis. In theory symmetrical arrangement prevails, e.g. Kermani and Goc (1999), Blass et al. (2000), and Kanócz (2002) etc.
CONCLUSIONS
- Nails/screws should be inserted symmetrically into the angle holes pattern to achieve better loading capacity.
- Longer jointing elements bring about higher joint strength in accordance with current standards.
- Use of non-loaded bearing element of greater dimension, than the loaded element, is suitable for this type of joint. Therefore, the bearing element will not transfer overturning moment into the joint. But the loaded element cross-section should be also increased.
- Further research is needed in the area of the influence of angle dimensions and type.
ACKNOWLEDGMENTS
The paper was partially supported by grant of the Ministry of Agriculture of the Czech Republic, NAZV, No. QJ 1330233 and also by project of the Internal Grant Agency of the Faculty of Forestry and Wood Sciences, No. B05/15. The authors would like to thank the Technical University in Zvolen, Slovakia for providing the testing laboratory and equipment.
REFERENCES CITED
Blass, H. J., Eberhart, O., and Wagner, B. (2000). “Zum rechnerischen Nachweis von Winkelverbindern,” Bauen mit Holz 03.
EN 26891 (1991). “Timber structures. Joints made with mechanical fasteners. General principles for the determination of strength and deformation characteristics,” European Committee for Standardization, Brussels, Belgium.
Hrčka, I. (1996). “Dimenzovanie drevených prvkov [The designing of wood elements]”, Scriptum, Technical University in Zvolen, Slovakia, 177 p. (in Slovak).
ISO 13061-1 (2014). “Physical and mechanical properties of wood — Test methods for small clear wood specimens — Part 1: Determination of moisture content for physical and mechanical tests,” International Organization for Standardization, Geneva, Switzerland.
ISO 13061-2 (2014). “Physical and mechanical properties of wood — Test methods for small clear wood specimens — Part 2: Determination of density for physical and mechanical tests,” International Organization for Standardization, Geneva, Switzerland.
Johansen, K. W. (1949). ”Theory of timber connections,” International Association of Bridge and Structural Engineering, Bern, Switzerland, publication No. 9:249-262.
Kanócz, J. (2001). “Theoretical and experimental analysis of the steel hanger
connectors,” Proceedings of the International RILEM Symposium – Joints in Timber Structures, 12 – 14 September, Stuttgart, Germany, pp. 99-100.
Kanócz, J. (2002). “Calculation and design of the face mount hanger connections in
timber structural engineering,” Wood Research 47(1), 13-24.
Kermani, A., and Goh, H. C. C. (1999). “Load–slip characteristics of multi–nailed timber joints, Proceedings of the ICE – Structures and Buildings 134(1), 31-43. DOI: 10.1680/istbu.1999.31251.
Koželouh, B. (1998). “Dřevěné konstrukce podle Eurokódu 5: Step 1
Navrhování a konštrukční materiály [Wood construction accordance to EUROCODE 5: Step 1 Design and construction materials].”1st Ed., KODR, Zlín, 400.
Kuklík, P., and Šťastný, R. (2002). “Tenkostěnné ocelové spojky pro dřevěné konstrukce [Thin steel fasteners for wood constructions],” Proceedings of the International Symposium – Wood Structures, 27-28, March ,Volyňe, Czech Republic, 51-56.
Požgaj, A., Chovanec, D., Kurjatko, S., and Babiak, M. (1997). Štruktúra a Vlastnosti Dreva [Structure and Properties of Wood], Príroda a. s., Bratislava, Slovakia.
Ruman, D. (2009). Interakcia dreva a oceľových profilovaných tenkostenných spojovacích prostriedkov v konštrukčných spojoch drevených konštrukcií [Interaction of wood and thin steel fasteners in construction joints for wood structures], Dissertation Thesis, Technical University in Zvolen, Slovakia, pg. 148 (in Slovak).
Article submitted: August 27, 2015; Peer review completed: October 16, 2015; Revised version received and accepted: October 21, 2015; Published: November 6, 2015.
DOI: 10.15376/biores.11.1.33-43

